SETTING OUT FOR TILING
Tools required :- Spirit level, tape measure, hammer or battery / power drill, medium screwdriver, pencil, marker pen.
Spending a little time on the setting out of your tiling can save you having to make difficult cuts in tiles and improve the overall finished look and layout. Having the first row of tiles perfectly level is the key to a good tiling job, if they are not level you will be making adjustments to tile positions across the whole wall, and it can become frustrating and time consuming.
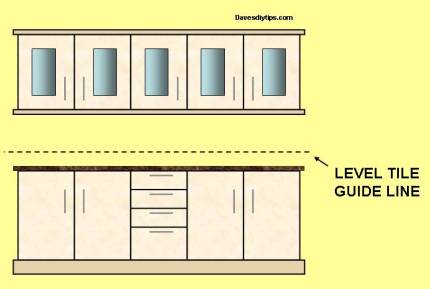
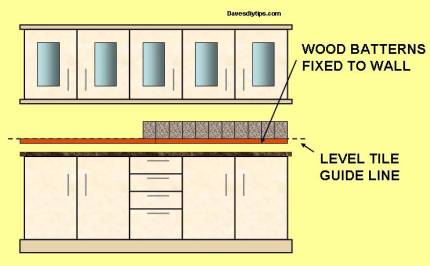
If worktops, floors and bath rims etc, are not level, mark a level pencil line on the wall with a spirit level, this line should allow for the tiles below it to be able to have a cut of at least 1/2″ (13mm) to bring them level with the surface below. When you are ready to start tiling, fix a straight timber batten(s) in place, level with the pencil line using either nails or rawlplugs and screws ( 1″ x 1″, 25mm x 25mm batten(s) will be suitable), as shown in the diagrams below :-


Any cut tiles on the bottom row will look better if they have a plain finish rather than a pattern, as patterned tiles will be more noticeable.
Make yourself a guide rod, again from 1″ x 1″ (25mm x 25mm) timber or smaller and mark the tile width and joint width on it (see diagram below). You can then transfer these marks across the wall and you will be able to see what size of cuts you have to make at either end, if the cuts are too small, adjust the start position of the guide rod and remark the wall. When you have marked the tile positions across the wall and are satisfied with there position, mark vertical lines with a spirit level to give your tiling a vertical guide line. The guide rod also gives you a reasonably accurate idea of where tiles will end up in relation to any power sockets and switches which you will have to cut around, if the cut is too difficult to make in the tile, i.e. in the middle of a tile instead of a corner then once again adjust the start point of the guide rod.
Around window reveals I normally try to start tiling from the centre out, but use the guide rod to mark the wall to check, as above, that end tile cuts won’t be too small etc. When you have finished setting out your tile positions it should be easy to count how many tiles you require for the job, remember to add around 10% for breakages and cuts, if you prefer to measure the wall in sq mtrs, use the Tile calculator chart to find out how many you will need of your particular sized tile, the most common sizes are on the chart.
