This post may contain affiliate links. If you buy a product or service from an affiliate such as Amazon after clicking a link on this website, we earn a commission from qualifying purchases.
Replacing a ceiling rose is a job that can be carried out by a competent DIYer, but as always, if you’re not confident working with electricity you should use the services of a reliable electrician.
The best way to find a decent electrician is by asking your friends (Facebook is perfect). Failing that, check your local paper or use a website like TrustATrader, Rated People or Checkatrade.
Below you’ll find a list of tools needed to replace a ceiling rose. You should have most of them in your DIY toolkit. If not, a quick trip to Wickes or B&Q will sort you out.
Tools required
- Side cutters (snips)
- Insulated medium size screwdriver
- Insulated terminal screwdriver
- Wire strippers
- Marker pen
- Either test lamps or a meter to confirm the electrical supply to the ceiling rose is isolated
Start by switching off the consumer unit and removing the appropriate circuit fuse / miniature circuit breaker.
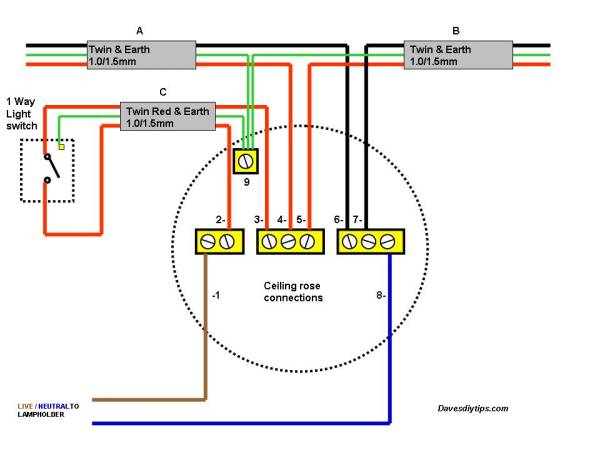
Fig 1 shows the most common way a ceiling rose is connected assuming that the wiring is in the ‘old’ colours of Red – Live, Black – Neutral, Green / Yellow – Earth.
- Cable A and Cable B are the live, neutral and earth loop to each of the ceiling roses / lights in the circuit, they remain ‘live’ regardless of the light switch position, hence why the circuit needs to be isolated.
- Cable C is a twin red and earth which is connected to the light-switch.
- 1 and 8 are the live and neutral conductors that connect to the ceiling rose lamp holder.
- 2 is the return live (switch-wire) from the light-switch.
- 3 is the live feed to the light-switch.
- 4 and 5 are both live conductors.
- 6 and 7 are both neutral conductors.
- 9 is the earth terminal for each of the earth conductors from each cable, the earth cables must be connected to the terminal, so must the earth at the light-switch if there is a metal back box or metal light-switch.
When the circuit has been isolated and tested it is a good idea to mark the insulation on the three live conductors (3,4,5) with a dot from a marker pen to make them easier to identify. These are the conductors that most DIYers connect back up incorrectly.
The two conductors 2 and 3 can be reconnected the wrong way round and the switch will still work correctly, the neutral conductors 6 and 7 are obviously easily identifiable but must be connected to ‘their own’ terminal block within the ceiling rose.
Top Tip: Another simple idea aside drawing how the ceiling rose is connected is to take a photo on your mobile for reference later.
Loosen the terminal screws one at a time and pull out each conductor. Take care not too loosen the screws too much if the ceiling rose is going to be re-fitted, as they are very small and trying to find them after they have fallen on the floor can be a great source of amusement for everyone but you.
Remove the fixing screws and take down the ceiling rose.
When the replacement has been fixed in place ensure all connections are tight and all earth conductors are reconnected. Replace the fuse / miniature circuit breaker and check the light works as it should. Don’t forget to check other lights nearby are also working correctly as any errors made in reconnection can affect them too.
Below are diagrams of other common ways a ceiling rose will be connected.

Fig 2 shows a common occurrence where the electrician has installed twin and earth for cable C (Red and Black) instead of twin Red to the light-switch, the Black conductor should at least be sheathed with red sleeving to show it is a live conductor, you must mark this conductor with either Red sleeving or Red tape to avoid problems when reconnecting the ceiling rose.
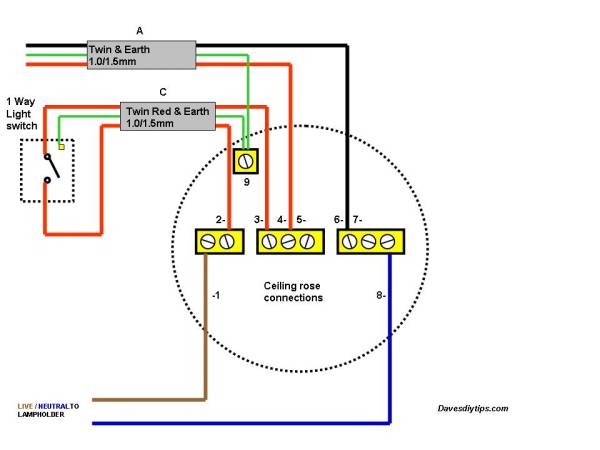
Fig 3 shows the last ceiling rose on the circuit and therefore there is only two cables present, cable A is the live, neutral and earth supply, cable C is the twin Red and earth to the switch, but once again Red and Black could have been used instead of the twin Red.
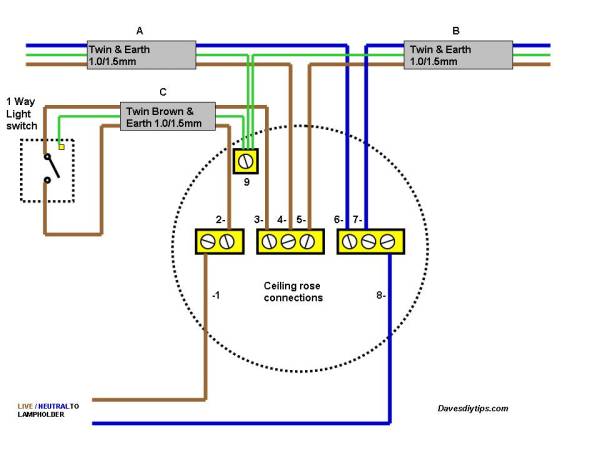
Fig 4 shows the same configuration as fig 1 but this time using the ‘new colours’ for electrical installations, i.e. Brown is the live conductor, Blue is the neutral conductor and Green / yellow is the earth conductor.
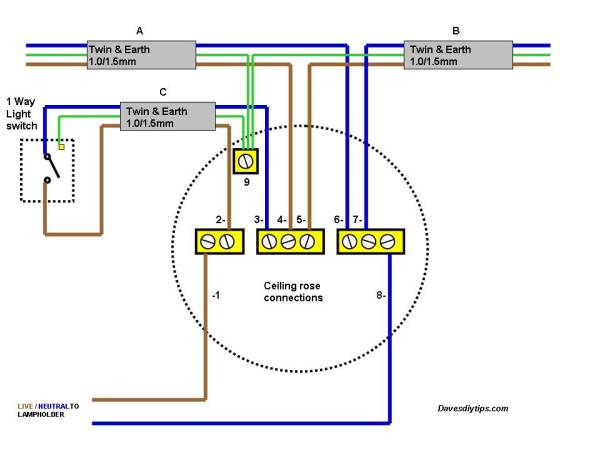
Fig 5 shows as with fig 2 that the electrician has used twin and earth for cable C instead of twin Brown and earth, once again the Blue conductor should be either sleeved or taped Brown to show it is a live conductor to help to avoid problems when reconnecting the ceiling rose.
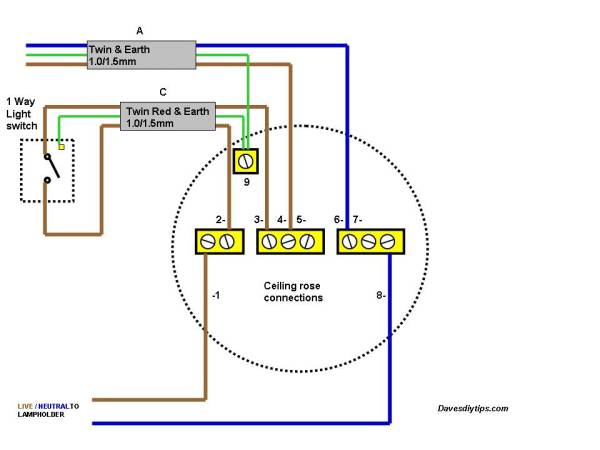
Fig 6 shows in the ‘new colours’ the last ceiling rose on the circuit with only two cables present, cable A is the live, neutral and earth supply to the ceiling rose, cable C is the twin Brown and earth to the light-switch. But once again Brown and Blue could have been used instead of twin Brown.